How to Apply and Get Certified at Scribie
Are you looking for home-based online work to earn extra income? If you are, this blog will answer that question and many more related to the transcription job opening at Scribie. So what is transcription? Transcription is the process of converting an audio/video file into a document. The work involves listening to audio files and […]

Are you looking for home-based online work to earn extra income? If you are, this blog will answer that question and many more related to the transcription job opening at Scribie.
So what is transcription? Transcription is the process of converting an audio/video file into a document. The work involves listening to audio files and typing them out.
If you would like to know what the requirements are to qualify to work as a transcriber or transcriptionist and whether you should apply, the blog ‘Am I qualified to work as a transcriber?’ will answer that question.
This blog will mainly discuss the 5-step Certification Process and related questions regarding applying as a transcriber with us.
Certification Process Overview
In summary, if you plan to apply, you need to go through the 5-step Certification Process to get certified with us. Once you get certified with us, files will be made available to you and you can choose which one you would like to work on. You can also preview the file so you could make the right decision. The file’s difficulty will be listed there as well. The files will vary in duration and difficulty and this will determine their rate. Most files are about 6 minutes in length.
After you have selected a file, you are going to edit the generated transcript using our online editor based on what you hear from the audio. You are given two hours to work on it and you can also request a one-hour extension should you require it. Once your file had been successfully submitted, it will undergo our 4-step transcription process to assure an accuracy of 99% and above. If the file is not rejected, you get paid for it. Your payment will be accumulated in your account with us. You could withdraw your earnings from your Scribie account to your PayPal account at any time with any amount.
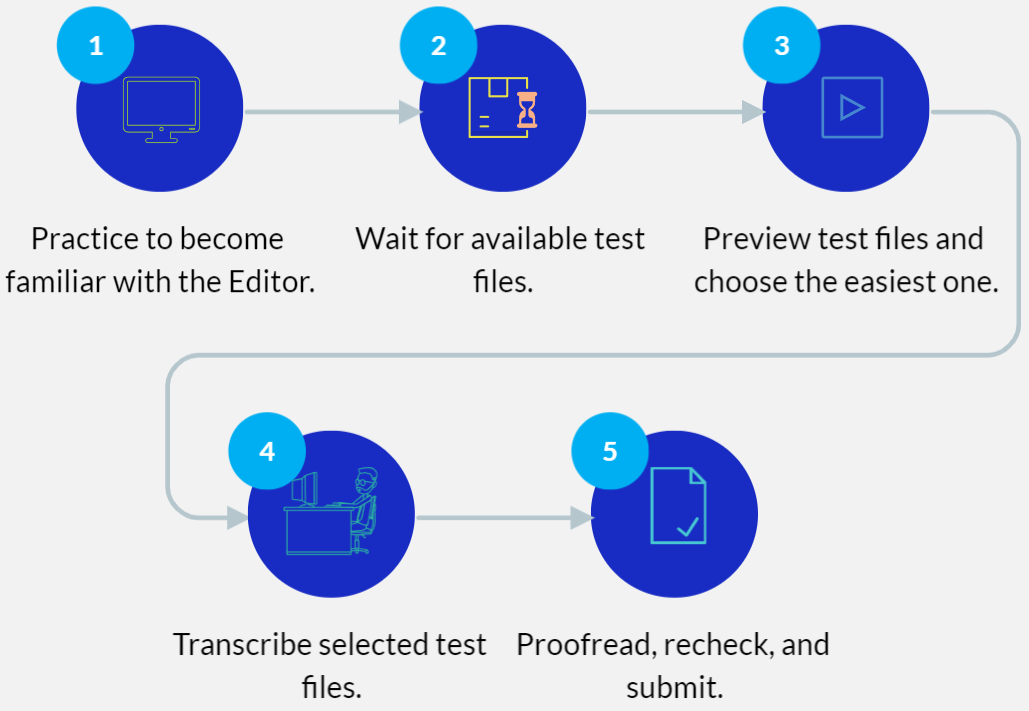
The following figure shows the 5-step Certification Process you need to go through to apply as a transcriber at Scribie. Is this process necessary? The answer is yes, as this is the only way to apply as a transcriber with us.
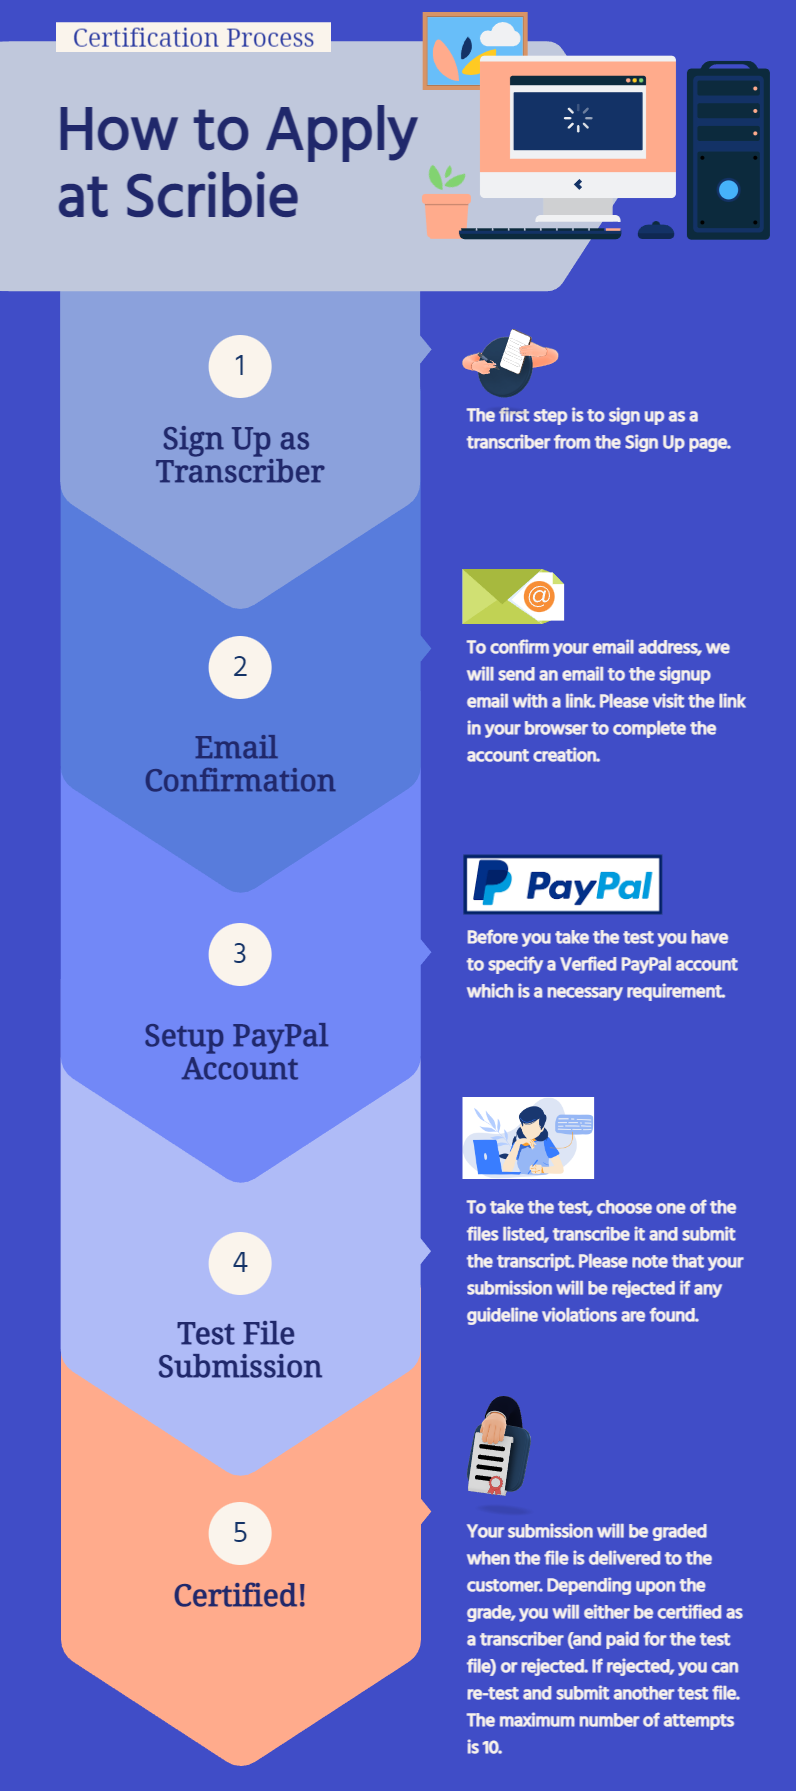
The following sections discuss each step in detail.
1 Sign Up as a Transcriber
The first step in the certification process is to create a transcriber account with us. Here is the link to the Sign Up Page: https://scribie.com/account/sign-up?type=transcriber.
 When you are looking for work or looking for a way to earn extra income, please only choose ‘Transcriber’ and not ‘Customer’ when signing up. You may laugh at why we even mention that. But there are a lot of applicants here at Scribie that started by creating a customer account, so we cannot say that “common sense” is really “common”.
To create a Transcriber account, choose ‘Transcriber’ as the account type.
The following FAQs are some of the most common questions applicants ask when creating an account with us.
What should I do if I created a customer account by mistake?
Please delete your customer account and then sign up as a transcriber. To delete your account, please log in and go to the Settings page then proceed to the bottom of that page where you can see the red button, Delete Account. You can also use the link https://scribie.com/settings#delete-account.
When you are done deleting the customer account, please use the link below to sign up as a transcriber.
https://scribie.com/account/sign-up?t=transcriber
After creating a transcriber account, please visit our Freelance Transcription Program as the application/certification process, the transcription process, payment details, and all requirements are detailed on this web page.
What if I need both a customer account and want to apply as a transcriber as well?
If you require both types of accounts for any reason, ensure to use a different email address, so they do not get mixed up. If you create both accounts using the same email address, whenever you log in, you can only access your customer account. Thus to avoid this issue, please use a different email address if there are circumstances that require you to create both accounts.
What if I am getting the ‘Page Not Found’ or ‘Forbidden’ error message when signing up?
This can happen if the link you are using is broken or you are using the signup link of the old UI or you have a browser/ISP issue.
About the UI, please note that we have upgraded our website to the new UI and the signup page has been updated as well. Please check that the link you are using is the following:
https://scribie.com/account/sign-up?type=transcriber
About the browser/ISP issue, please visit the blog ‘Browser Troubleshooting Tips’ as it details how to resolve those types of issues.
What if I cannot see the reCAPTCHA on the signup page?
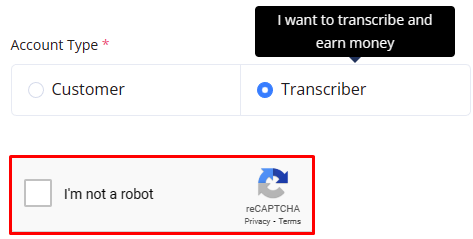
In case you encounter this issue, most of the time this is a browser-related issue. Please check the blog ‘Browser Troubleshooting Tips’ for more information on how to resolve this issue.
Another possible reason is that you are restricted from viewing the page properly. If this is the case, please reach out to your ISP support team on how to resolve the issue.
What should I do if the signup page is not accepting my phone number? It is showing as invalid.
The phone number field is OPTIONAL here at Scribie. So you can just ignore or leave that field blank.
Please note that if you get that error message, ensure that the page you are looking at is the Scribie.com page and not the PayPal.com page. If you are getting the invalid phone number error message, take a look first at the webpage you are at. Most likely you are at the PayPal.com page. If that happens, please reach out to PayPal support and not Scribie support as PayPal support is the best support team who can assist you with questions related to PayPal’s web pages.
2 Email Confirmation
After creating an account, you need to confirm your email address.
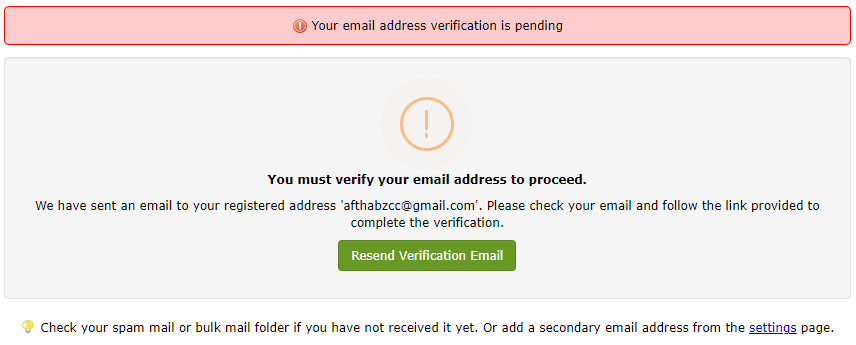
Once you submit your application form, a confirmation email is automatically sent to the email address you used to sign up. To confirm your email address, check your email for the email confirmation from Scribie. In the email, please follow the instructions, that is, visit the email confirmation link in your browser to complete the email confirmation.
You can also resend the email verification by visiting the following link and clicking on ‘Resend Verification Email’.
https://scribie.com/verify-email
What if I misspelled my signup email address?
You can delete your applicant account and sign up with an alternate email or sign up with the correct email address. You can also change the email address on the Settings page.
How do I change my signup email address?
You can change your email address via the following link. Just follow the instructions provided.
https://scribie.com/settings#secondary-email
After the new email has been verified, please click on the ‘Set As Login Email’ button. Doing so should now change the login email address of your Scribie.com account to the new one.
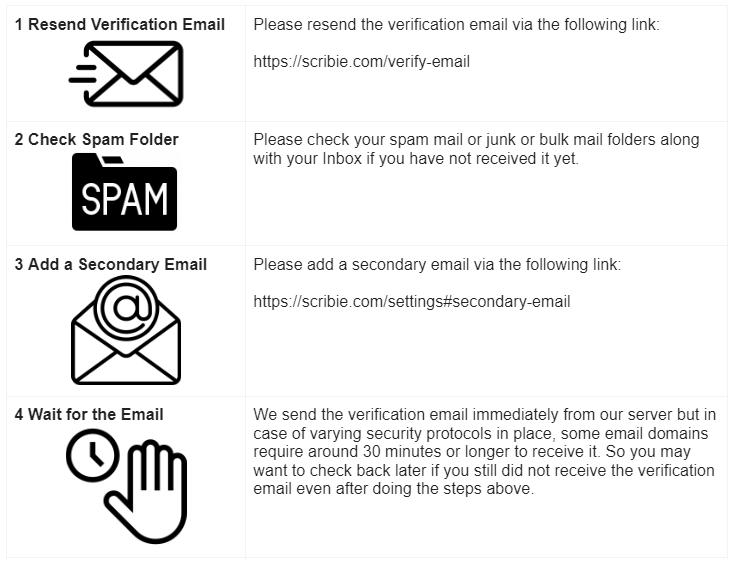
What if I have not received the verification email?
We suggest the following steps if you do not see the confirmation/verification email.
3 Setup PayPal Account
Before you can take the test, you need to add a Verified PayPal account. This step cannot be bypassed. Also, a verified PayPal account is a mandatory requirement. Please only apply once you have met this requirement. Please read the blog ‘Why a Verified PayPal is Required in the Scribie Application Process’ for more information and FAQs regarding this step.
To continue with your application, log in to your Scribie account, click on the ‘Log In With PayPal’ button and follow the prompts to link your verified PayPal account to your Scribie account.
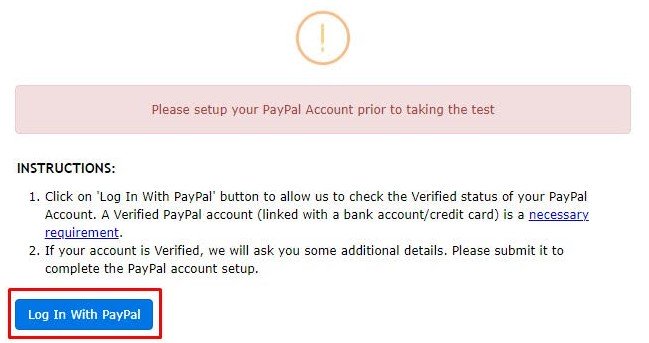
If you have questions about why a verified PayPal is needed, what verification means, any error message you receive when you try to ‘Log In With PayPal’, how to create a PayPal account, is logging in with PayPal safe, etc. please check the blog ‘Why a Verified PayPal is Required in the Scribie Application Process’ as this blog covers the topic about PayPal in detail.
In case you are wondering, is it possible to take the test first before adding a verified PayPal account? The answer is no.
In case you do not want to share your PayPal details, then your application will not proceed since the above step needs to be completed first.
4 Test File Submission
You are almost there. The next step is to take the test and pass it, after which you can start earning at Scribie. To take the test, the procedure is as follows:
4.1 Practice Files
We encourage every applicant to practice first before taking the actual test. This is because the online Editor that we use at Scribie to transcribe is developed in-house, so you need to become familiar with how to use it before taking the actual test. This will increase your chances of passing. So please do all the practice files on the Practice Files page first before doing the actual test.
4.2 Wait for Available Test Files
Due to the increasing number of applicants at Scribie, the number of test files is usually not enough for all applicants. Thus you will need to wait for test files to become available. More on this in the ‘All You Need to Know About Test Files’ blog post.
To check for test files, just log in (https://scribie.com/account/sign-in) periodically to your account to check for new test files, or bookmark the Test tab link below. We recommend using Chrome Incognito Mode or Firefox Private Mode browsers to check.
https://scribie.com/transcription-test#files
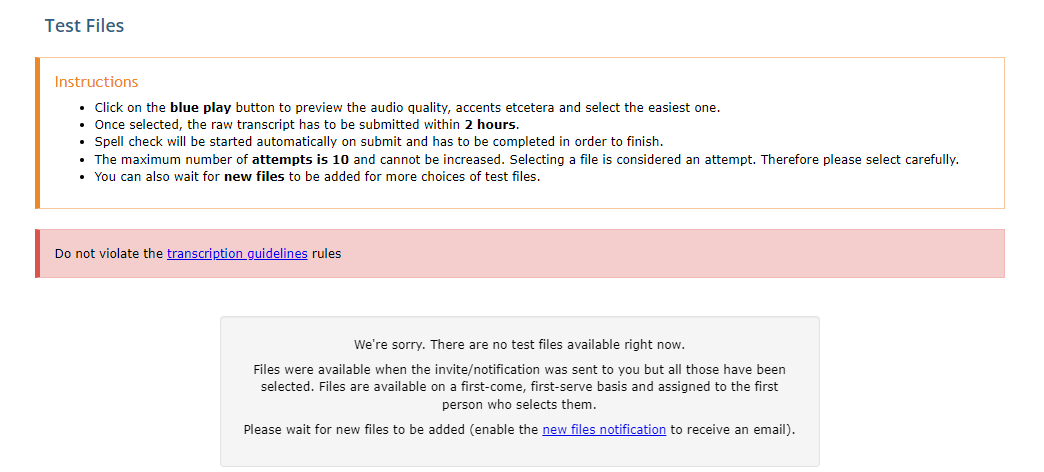
Regarding questions about test file availability, please visit the blog post ‘All You Need to Know About Test Files’.
4.3 Preview Test Files
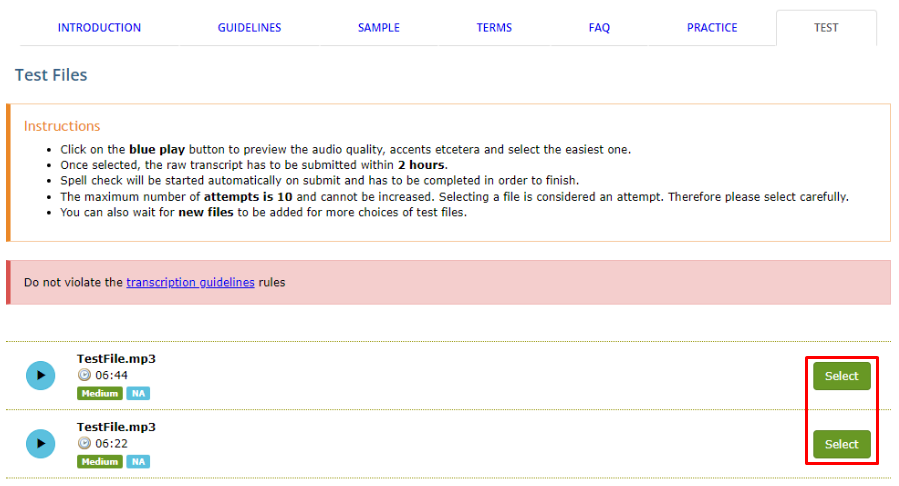
 Not all test files are valid and the difficulty level varies as well so we suggest that you click on the preview button several times to check the content and quality of the audio file before selecting it so as not to waste any of your 10 attempts.
4.4 Transcribe Selected Test File
Click Select to select a test file. Once you select a test file, it gets assigned to you. Once you open the online Editor, the automated transcript is loaded by default. This is machine-generated so you need to play the audio file and correct all mistakes, mishears, misspells, missing words/phrases, incorrect punctuation, incorrect capitalization, etc. that you see in the transcript. Please work on it immediately as the file has timeout rules. Please visit the blog post ‘All You Need to Know About Test Files’ for more information.
4.5 Proofread and Submit
Once you are done editing the automated transcript, we suggest that you do another pass or two to ensure that you did not miss anything. After that, click on submit, follow the prompts for the spellcheck, then click on Submit again.
Once you successfully submit a file, you will receive a pop-up saying that the file was successfully submitted. You will also receive an email confirming that the file was submitted. Ensure that you receive those confirmations to ensure that you have successfully submitted your test file.
After that, please wait for the result. You will receive an email once the result is out.
5 Certification
Your submission will be graded when the file is delivered to the customer. Depending upon the grade, you will either be certified as a transcriber (and paid for the test file) or rejected. If rejected, you may compare the differences between your submission and the reviewed file, enable re-test and submit another test file. The maximum number of attempts is 10.
If you submit a test file, sometimes it gets automatically rejected, like in the figure below. Regarding automatically rejected files, these are rejected based on the number of major changes/errors found by the system with +/-5% accuracy. This means the corrections you made are not enough thus the minimum accuracy required to pass the test is not met.
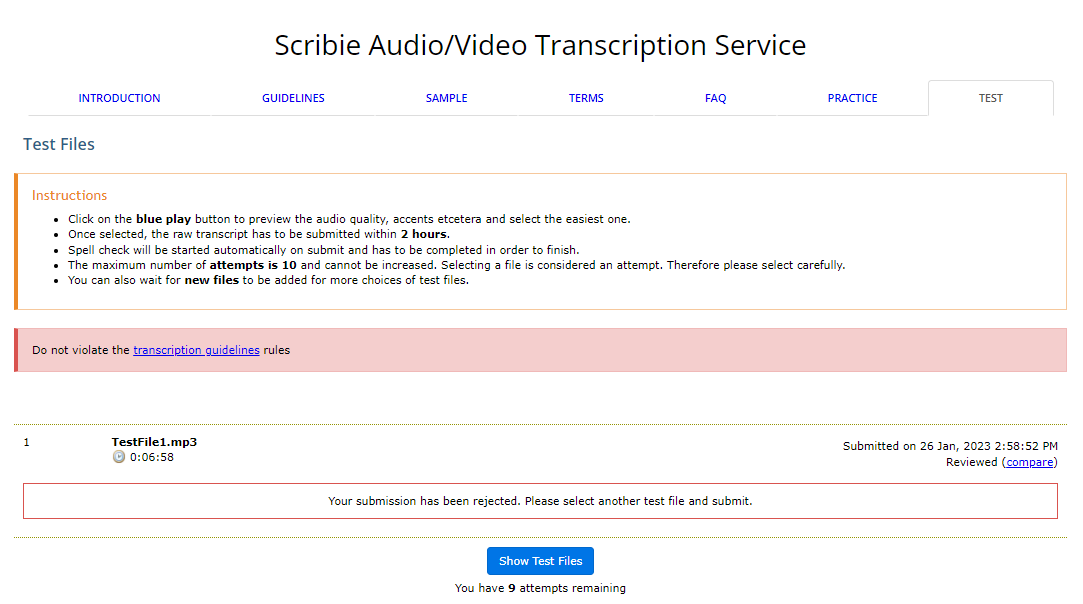
Some ask whether the automatic rejection is valid. The answer is yes, it is. Our tech team has extensively tested the algorithm and it was found to be very accurate.
After you submit a test file, the file will go through the usual 4-step transcription process so will be transcribed (this is the test you did), reviewed, proofread, and QC’ed. The diffs will show the difference between your submission and the QC’ed file. So if your test was automatically rejected, wait for the diffs to show to see where your mistakes are. After that, you may take another test as a maximum of 10 attempts are provided to have you covered for cases like this.
If your test file passes our minimum accuracy requirement (a grade of 3 or higher), then congratulations as you get certified with us.
You will be shown the Terms and Conditions once you log in to your account. Please ensure to read through the terms carefully before signing as we expect that you will be abiding by those terms and conditions as you work freelance here at Scribie.
Other Application FAQs
Other common questions related to applying with us are detailed below. These are the application-related FAQs published in the Transcriber Guide. We have added it here for quick reference.
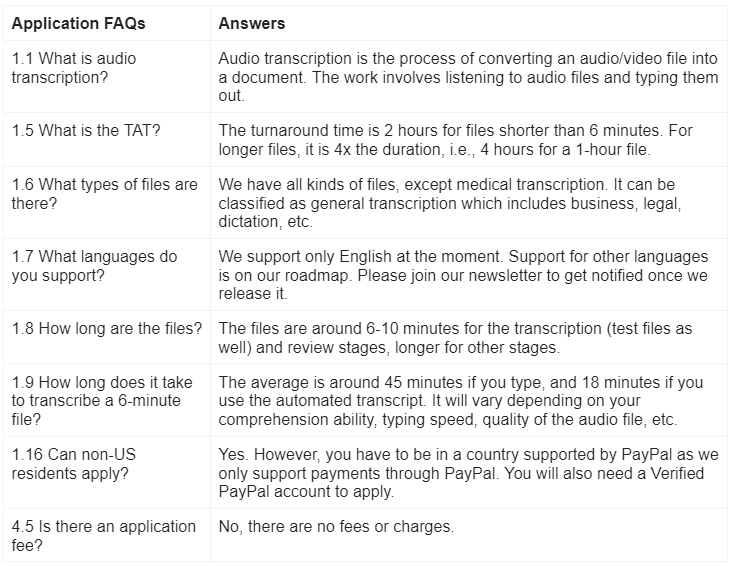
Do I have to take a test?
Yes, taking a test is mandatory. You have to pass the test to get certified with us.
Is there an interview in the application process?
None. An interview is not a part of the application process.
Are you currently hiring?
Yes, we are, but only for part-time freelance transcribers.
Are you hiring translators?
No, since we only transcribe English audio/video files into English text. Thus, we have no need for translators at this time.
I live in a country where PayPal is not supported, can I still apply?
Yes, you can, as long as you can secure a verified PayPal account. You can use someone else’s PayPal account.
I do not have a PayPal account, can I apply?
You can still create a transcriber account however your application will be stuck at step 3 until you secure a verified PayPal account.
Is this a home-based job?
Yes, it is. We do not restrict our transcribers’ geographical location. So you can work freelance with us as long as you have a computer with a stable internet connection.
Is this a legitimate job opportunity?
Yes, it is. We have been in operation from March 2008 until now. We have transcribed more than 8 million minutes of audio since 2008 and have certified 50K+ transcribers.
Here are some 3rd party analyses comparing the best transcription service providers, including Scribie.
- https://www.techradar.com/best/best-transcription-services
- https://www.pcmag.com/picks/the-best-transcription-services
Do I need to upload a file when I apply?
No need, as uploading a file is only required for our customers wanting to pay us to transcribe their files for them. Thus not applicable to applicants. For those rolling their eyes reading this, we actually quite get this type of query often so please bear with us.
I would like to order a file to apply as a transcriber, can I do that?
No, as that is a wrong process. Those who place orders with us are customers who pay us to transcribe their files for them. For those wanting to apply so they are paid to transcribe files, please follow the 5-step Certification Process detailed in this blog as that is the correct process to apply and get started working as a freelance transcriber at Scribie.
I do not understand what I should do here?
If you are looking for a part-time freelance job to earn extra income, please read through this blog to learn how to apply as a part-time transcriber at Scribie. Please also check the ‘Am I qualified to work as a transcriber?’ blog to see if you qualify to apply.
Once I delete my applicant account, can it be restored?
No, we do not keep backups. So once you delete your account, it is permanently deleted.
Is there a possibility I will not be paid for the work done?
Yes, if your submission has a grade of 0, meaning it is unusable for us. It will be paid if your file has a grade of 1-5. The other instances where submitted files are not paid are:
(1) When the customer decides not to proceed with their order as they can cancel their order anytime before it reaches 60% completion; and
(2) The file gets stuck in the pipeline meaning our transcribers are not willing to work on the file, so it does not progress. If several days have already elapsed and the file has no progress, we will return the file to the customer. Thus, this is a shared risk for both the company and our transcribers as both will not be paid if this happens.
Does Scribie allow its transcribers to work with other transcription companies at the same time?
Yes, we do as the work is freelance so our freelancer transcribers can freely work with one or more other transcription companies aside from Scribie if they prefer.
Can I re-apply?
Yes, you can. However, there is a cooldown of 6 months or 180 days after you delete your account. You can only add that same PayPal account to your applicant account after 180 days or 6 months have elapsed.
Please note that the 180 days countdown will only start once you delete your account with us – whether you just want to start over (not recommended if you only have an applicant account with us) or whether you previously got certified with us but got disabled.
The procedure to re-apply is shown in the figure below.
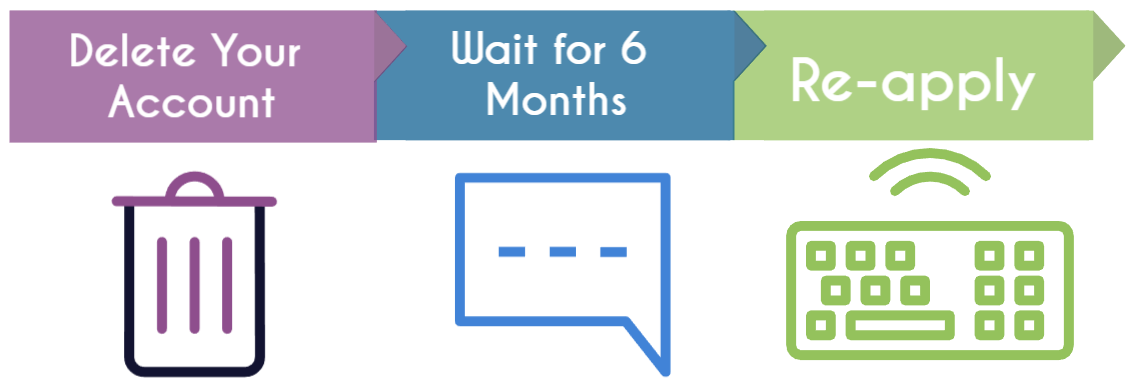
1) Delete your Account
You can delete your account by going to the Settings page and then proceeding to the bottom of that page for the red ‘Delete Account’ button. You may also use the link below.
https://scribie.com/settings#delete-account


Once you delete your account, all the data associated with your account will be removed forever. The account cannot be restored once deleted.
2) Wait for 6 Months
Once you delete your account, wait for 180 days or 6 months. Regarding the waiting period, the reason is that those who want to reapply are usually those who got certified with us before but got their account disabled since they were not able to maintain the required minimum average grade. Thus, 6 months are allotted to give time for these transcribers to improve their skillset.
While waiting, we recommend that you continue to improve your skillset since it takes time to develop the skillset required to be a good transcriber. The skillset required is discussed in detail in the blog ‘Am I Qualified to Work as a Transcriber?’.
Here are some more blog links that may help.
- Beginner Transcriber Guide and Quick Tips
- Basic Transcription Skills: Guide to Getting Started
- 9 Transcription Productivity Tips from Scribie Professionals
3) Re-apply Using the Same 5-Step Certification Process
After 6 months elapse, you can apply again by following the same steps you did before, detailed in this blog post. There is no difference in the process when you are a new applicant or you are re-applying.
Comments (0)
No comments yet. Be the first to share your thoughts!